
Ever seen a device that's both a light switch and a bodyguard for your industrial equipment? That's the simplest way to think about a fuse disconnector switch. It's a single, rugged component that marries the manual on-off control of a switch with the automatic overcurrent protection of a fuse, letting you safely kill power for maintenance while shielding your machinery from electrical damage.
The Two-in-One Job of a Fuse Disconnector Switch
In any plant or on any factory floor, keeping people safe and machines running are the two pillars of a successful operation. The fuse disconnector switch is a cornerstone for both, handling two critical jobs at once. It’s not just a switch, and it’s certainly more than a simple fuse holder—it's an integrated safety device that solves some of the biggest challenges in industrial control.
This dual-function design is exactly why it's so dominant in the market. In fact, fused models accounted for a staggering 67.79% revenue share in 2023, within a global disconnect switch market valued at USD 15.02 billion. Why the preference? Because it’s a proven way to prevent catastrophic failures in industries where every minute of downtime costs a fortune. You can see more market data on disconnect switches over at Grand View Research.
To help clarify how it pulls off this double duty, let's break down its two primary functions.
| Function | Mechanism | Primary Goal | Key Benefit |
|---|---|---|---|
| Circuit Protection | Fuse element melts during overcurrent or short circuit, breaking the circuit. | Protect downstream equipment from electrical damage. | Prevents costly equipment failure and extends asset life. |
| Manual Isolation | User operates a handle to physically separate electrical contacts (create an air gap). | Ensure a zero-energy state for safe maintenance and servicing. | Enables compliance with Lockout/Tagout (LOTO) procedures. |
In essence, the fuse provides the automatic protection, while the switch provides the manual control needed for human safety.
The Gatekeeper for Electrical Safety
First and foremost, the device is your local point of isolation. Picture a maintenance tech needing to work on a critical conveyor motor. Without a clear and verifiable way to de-energize that motor right where the work is happening, the job becomes incredibly dangerous. The disconnector’s handle provides that positive break, physically separating the contacts and creating a visible air gap in the circuit.
This is the bedrock of any Lockout/Tagout (LOTO) safety program. The handle is almost always lockable, ensuring the machine can't be accidentally powered back on while someone's hands are in it. It’s the definitive gatekeeper, guaranteeing a zero-energy state so your team can work safely. You can get a deeper dive into the basics of what a disconnect switch does in our detailed guide.
The Bodyguard for Valuable Equipment
At the same time, the device stands guard over your valuable assets. Housed inside are fuses, each one carefully sized for the specific circuit it’s protecting. If a short circuit or a dangerous overload condition occurs, the fuse element is designed to melt and break the circuit—all within milliseconds.
This rapid, sacrificial action stops destructive electrical energy dead in its tracks, long before it can fry expensive motors, VFDs, or PLCs. It’s the frontline defense that often makes the difference between swapping out a simple fuse and facing a multi-thousand-dollar repair bill.
By combining these two roles into one compact unit, the fuse disconnector switch gives you a cost-effective and highly reliable solution for both control and protection.
How a Fuse Disconnector Switch Actually Works
To really get a feel for what these devices do, you have to picture what’s happening inside the box, both when you throw the handle and when an electrical fault suddenly erupts. It’s less like a single component and more like a well-drilled team, with each part playing a role in control and protection.
At its core, the whole assembly is a clever marriage of a simple manual switch and a set of sacrificial fuses, all bundled into one neat package. You’ve got the handle on the outside, a switching mechanism on the inside, carriers to hold the fuses, and the all-important electrical contacts. When you pull that handle, you’re physically moving a linkage that forces the contacts apart, creating an air gap that cuts the power. Simple, reliable, and effective.
The Two Modes: Manual Control and Automatic Rescue
Every fuse disconnector switch lives a double life, operating in two very different but equally vital modes: manual isolation and automatic protection. Nailing down this dual personality is the key to understanding why they're so essential in a control panel.
Here's the breakdown of how each one works:
- Manual Isolation: This is the hands-on part. An operator grabs the handle and moves it from ON to OFF. That simple physical action drives a cam or linkage inside, pulling the movable contacts away from the stationary ones. This creates a visible, verifiable air gap that completely de-energizes everything downstream, making it safe for a technician to get to work.
- Automatic Overcurrent Protection: This is the "hero" mode. When a short circuit or a massive overload hits, a huge wave of current surges through the fuse. The little filament inside is designed to vaporize in milliseconds under that load, instantly breaking the circuit. The fuse sacrifices itself to save expensive motors, drives, and other critical gear from getting fried.
This flowchart really brings the process to life, showing how the switch responds to an electrical event.
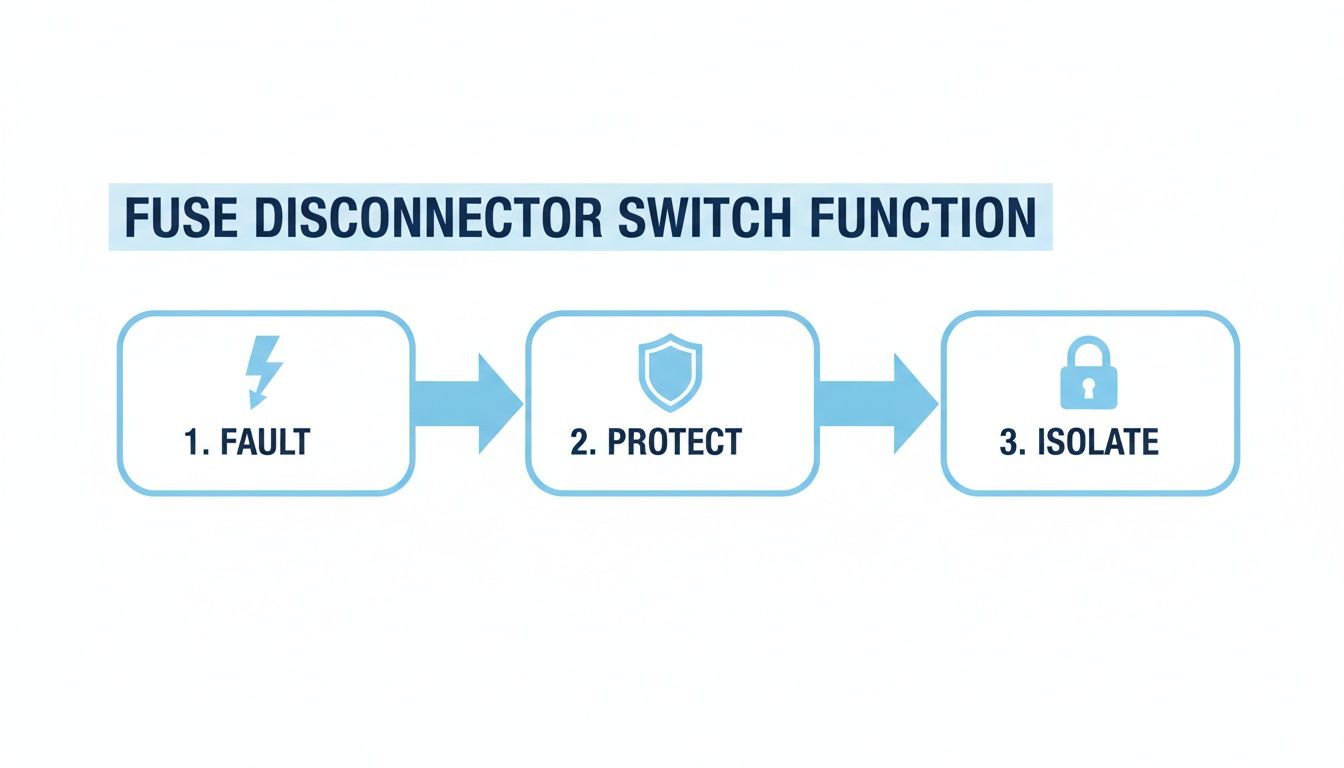
You can see the straightforward logic: a fault occurs, the device protects the circuit, and then it provides a safe point of isolation.
A Growing Role in Modern Systems
The beautiful simplicity and rock-solid reliability of this mechanism are why we're seeing it in more places than ever. The global market for these panel-mounted switches was already valued at USD 2.8 billion in 2024. Projections show it climbing to USD 5.1 billion by 2034, growing at a steady 5.9% CAGR. What's driving this? A boom in construction and an unending need for industrial control panels that are, above all, safe. You can dig deeper into the market dynamics from this industry analysis.
The core principle is simple but powerful: the switch provides the deliberate, manual control needed for human safety, while the fuses offer the instantaneous, automatic protection required for equipment integrity.
In the end, it doesn't matter if it's an operator pulling the handle or a fault triggering the fuse—the result is the same. A safe, de-energized circuit. This dependable, two-pronged approach is what makes the fuse disconnector switch a non-negotiable part of any modern industrial electrical system. It's all about protecting both people and machinery.
How to Select the Right Fuse Disconnector Switch
Picking a fuse disconnector switch isn't like grabbing a generic part off the shelf. Get it wrong, and you're not just looking at a minor hiccup—you're risking damaged equipment, code violations, and serious hazards for anyone working on the panel. The right choice is the one that keeps your system protected and safe to service.
Making the right call means digging into the unique demands of your application. A switch destined for a tight motor control panel has a completely different set of requirements than one acting as the main disconnect for a massive piece of machinery. Your selection process needs to be a methodical, step-by-step evaluation of the electrical environment and what you're trying to protect.
Key Ratings You Cannot Ignore
Think of electrical ratings as the switch's DNA. If they don't match your system, it’s a recipe for disaster. Three ratings, in particular, are absolutely critical.
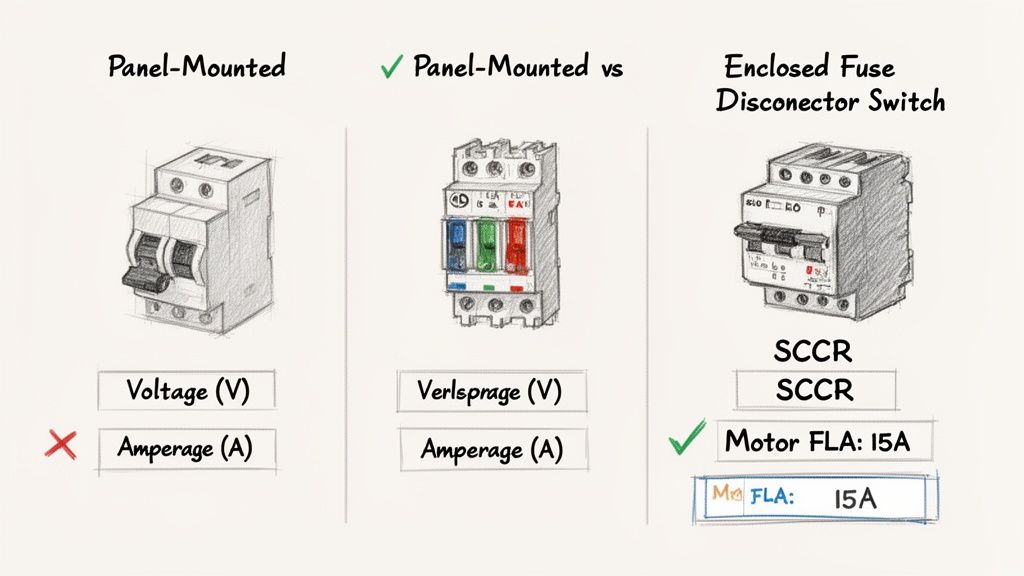
- Voltage Rating (AC/DC): This is non-negotiable. The switch's voltage rating must be equal to or, even better, greater than your system voltage. Using an underrated switch is asking for insulation failure and dangerous arcing.
- Continuous Current (Amperage): The switch has to handle the normal, everyday operating current of your circuit without breaking a sweat—or overheating. For motors, this is sized based on the Full Load Amps (FLA), usually with a safety factor baked in per code.
- Short Circuit Current Rating (SCCR): This is arguably the most important safety rating of them all. The SCCR tells you the absolute maximum fault current the switch can safely interrupt without catastrophic failure. It must be higher than the available fault current where it’s installed.
The SCCR isn't a suggestion; it's a hard-and-fast safety metric. An improperly rated fuse disconnector can literally explode if it sees a fault current beyond its capacity, creating a life-threatening arc flash and destroying equipment.
The relentless push for safer industrial environments has made these devices essential. In fact, the global market for In-Line Fuse Switch Disconnectors hit a staggering US$4,612 million in 2024, a number driven by strict safety standards that demand reliable overcurrent protection and isolation. This focus on safety is paying off, helping to reduce downtime by up to 30% in critical operations by enabling faster, safer repairs. You can dig deeper into these trends over at Valuates Reports.
Sizing for a Motor Control Application
Let's walk through a real-world scenario that every panel builder and plant engineer has faced: sizing a disconnect for a 10 HP, 480V three-phase motor.
- Find the Motor FLA: First, check the motor nameplate. A standard 10 HP motor at 480V will have a Full Load Amperage (FLA) right around 14 amps.
- Size the Switch Amperage: The NEC tells us the disconnect needs to be rated for at least 115% of the motor's FLA. So, that’s 14A x 1.15 = 16.1A. You can't buy a 16.1A switch, so you step up to the next standard size, which is a 30A model.
- Choose the Fuse Class and Rating: Here's where the nuance comes in. To handle the motor's inrush current on startup without blowing, you need a time-delay fuse. A Class J or RK5 fuse is perfect for this. The fuse amperage is sized higher than the FLA—often up to 175% or more, depending on the motor's code and design.
- Verify the SCCR: Last but certainly not least, you have to check the available fault current in the panel. Let's say it's 18,000A. You'll need a switch and fuse combination with an SCCR of at least 25,000A (the next common rating up) to be safe.
Fuse Class Comparison for Motor Circuits
Choosing the right fuse class is just as important as sizing the switch. The fuse determines how the device responds to overloads and short circuits. For motors, you need something that can handle the initial startup surge but act instantly on a dead short.
| Fuse Class | Key Characteristic | Typical SCCR | Best For |
|---|---|---|---|
| Class J | Fast-acting, current-limiting, compact size. Excellent for space-sensitive applications. | 200,000A | High-performance motor protection where SCCR and physical space are critical. |
| Class RK5 | Time-delay, current-limiting, dual-element design. Handles motor inrush well. | 200,000A | General-purpose motor circuits. A great balance of performance and cost. |
| Class CC | Time-delay, compact, "midget" fuse footprint. | 200,000A | Smaller control circuits and fractional horsepower motors. Not for larger loads. |
| Class T | Very fast-acting, extremely current-limiting, very compact. | 200,000A | Protecting sensitive solid-state components like VFDs; less common for standalone motor disconnects. |
By walking through this logical process—evaluating the ratings, understanding the load, picking the right fuse, and verifying the safety specs—you can specify a fuse disconnector switch that delivers both bulletproof protection and uncompromising safety.
Best Practices for Installation and Wiring
Getting the installation and wiring right on a fuse disconnector switch is about more than just making the lights come on. It’s about building a safe, reliable, and compliant system. A sloppy install is a ticking time bomb—it can lead to overheating, equipment failure, and serious hazards, especially inside a UL 508A control panel where every component has to pull its weight.
Think of it this way: the care you take here is the foundation of your entire electrical system. Do it right, and you've built something that will stand the test of time.
Mounting and Mechanical Setup
First things first, you have to physically secure the switch. The right method really depends on your panel's layout and the specific model you're working with.
- DIN Rail Mounting: For smaller switches inside a control panel, this is the way to go. It's fast, usually tool-free, and makes it a breeze to move things around during assembly.
- Panel (or Door) Mounting: Bigger, beefier switches are typically mounted straight onto the back panel or the enclosure door. This gives them a solid base and makes it easy to add a through-the-door operator handle.
That through-the-door handle is a non-negotiable for operator safety. It lets someone kill the power before they even think about opening the panel door, which is a massive step in preventing arc flash incidents. Make sure this handle is lockable to meet Lockout/Tagout (LOTO) standards.
Wire Termination and Connections
How you land your wires is just as critical as where you mount the switch. You’d be surprised how many electrical failures and fires come down to nothing more than a bad connection. Always double-check you're connecting incoming power to the line side and outgoing power to the load side. Getting that backwards can create a seriously dangerous situation.
When you're doing any of this work, having a solid permit to work system in place is essential. It's a structured way to manage hazardous jobs and ensure everyone stays safe by verifying that equipment is properly de-energized.
Pro Tip: Don't just guess on the tightness of your connections. Use a calibrated torque wrench. Manufacturers provide specific torque values for a reason. Over-tightening can strip or damage the terminal, while under-tightening creates a high-resistance spot that will do nothing but generate heat.
Finally, give the switch some breathing room. Both the NEC and UL standards require specific clearances around components. This isn't just for show—it prevents arcing and allows heat to dissipate properly. Jamming components together is a code violation and makes any future maintenance a nightmare.
Follow these practices, and you'll end up with a clean, safe, and inspection-ready panel. If you’re just starting your panel build, our guide to industrial control panel design has a lot more tips to get you going.
Navigating Safety Standards and Code Compliance
A fuse disconnector switch isn't just another part in a control panel; it's a critical link in the safety chain. Getting bogged down in the alphabet soup of safety standards can be frustrating, but understanding the why behind them is what really matters. These rules, created by organizations like UL, NFPA, and OSHA, exist for one reason: to prevent catastrophic electrical failures and keep people safe.
Think of it this way: compliance isn't about checking a box to pass an inspection. It’s about building systems that are fundamentally reliable. When a maintenance tech needs to service a piece of machinery, they have to be absolutely certain that throwing the disconnect handle creates a true zero-energy state. Their life depends on it.
The Why Behind the Rules
The standards that apply to a fuse disconnector switch aren't just arbitrary rules. They’re the hard-won lessons from decades of real-world incidents, each designed to address a specific piece of the safety puzzle.
- UL (Underwriters Laboratories): UL is all about the component's integrity. UL 98 specifically covers enclosed and dead-front switches, making sure they can handle the mechanical stress and electrical load of their job. Then you have UL 508A, the standard for industrial control panels, which dictates how that switch must be integrated into a larger, safe assembly.
- NFPA (National Fire Protection Association): Most people know NFPA 70 as the National Electrical Code (NEC). This is the playbook for installation. It tells you exactly where disconnects need to be, how to size them, and what clearances are required to prevent fires and shock hazards.
- OSHA (Occupational Safety and Health Administration): OSHA’s focus is squarely on the worker. Their regulations mandate Lockout/Tagout (LOTO) procedures, which are impossible without a lockable disconnect handle. This ensures a machine can't be accidentally turned on while someone is working on it.
At the end of the day, these standards work together to create a predictable, safe environment. A UL-listed switch, installed according to the NEC, and used as part of an OSHA-compliant LOTO program, forms an unbreakable chain of protection for both people and equipment.
SCCR and the Mandate for Safety
One of the most important—and often misunderstood—safety ratings on an industrial panel is its Short Circuit Current Rating (SCCR). This number tells you the maximum fault current the entire panel can handle without exploding or catching fire. The fuse disconnector switch is your first line of defense and is absolutely essential for achieving a high panel SCCR.
The fuses inside the switch have an incredibly high interrupting capacity, often 200,000A. This allows them to instantly protect all the downstream components—like VFDs or PLCs—that have much lower individual SCCR ratings. This makes the fused disconnect a foundational building block for any UL 508A compliant panel that is truly safe by design.
Of course, keeping up with best practices is always evolving, with some industries even exploring new tools like augmented reality safety in the workplace. It's also vital to understand the certifications on your components; you can get a clear breakdown in our guide to UL Listed vs. UL Recognized components.
Keeping Your Switch Healthy: Maintenance and Troubleshooting
Even the toughest fuse disconnector switch is not a "set it and forget it" device. To keep them reliable and safe for the long haul, a little proactive care goes a long way. For any plant engineer or maintenance pro, getting ahead of problems is always better than reacting to a failure that causes unexpected downtime or, worse, a safety incident.
Think of it like this: regular maintenance is the key to catching small issues before they snowball into catastrophic failures. A few simple visual and mechanical checks can tell you everything you need to know about the health of your switch.
The Go-To Preventive Maintenance Checklist
A simple, repeatable inspection is your best line of defense. Over months and years, machine vibration can work connections loose, and environmental factors like dust and humidity can take their toll. Building these steps into your routine PM schedule is non-negotiable.
- Torque It Down: Connections are notorious for loosening up. Use a calibrated torque wrench to make sure every line and load terminal screw is tightened to the manufacturer’s spec. A loose connection is just a hot spot waiting to happen.
- Work the Handle: With the power off, of course, cycle the handle a few times. It should feel smooth and solid, not stiff or sloppy. Any binding or excessive force is a red flag.
- Look for Hot Spots: Your eyes are one of your best tools. Scan for any signs of discoloration or charring on the wires, terminals, or the switch body itself. That’s a dead giveaway of overheating from a bad connection or an overload.
- Check the Fuses: Make sure the right fuses are in there. Verify they are the correct size, class, and amp rating for the circuit. Also, check that they're sitting snug and secure in the carriers.
Think of this as a quick physical for a critical piece of your safety system. Spending a few minutes on these checks can dramatically extend the life of the switch and keep your entire system safer.
The Right Way to Replace a Blown Fuse
Sooner or later, a fuse is going to do its job and blow to protect your equipment. When it does, replacing it has to be done by the book, with an absolute focus on safety. There are no shortcuts here.
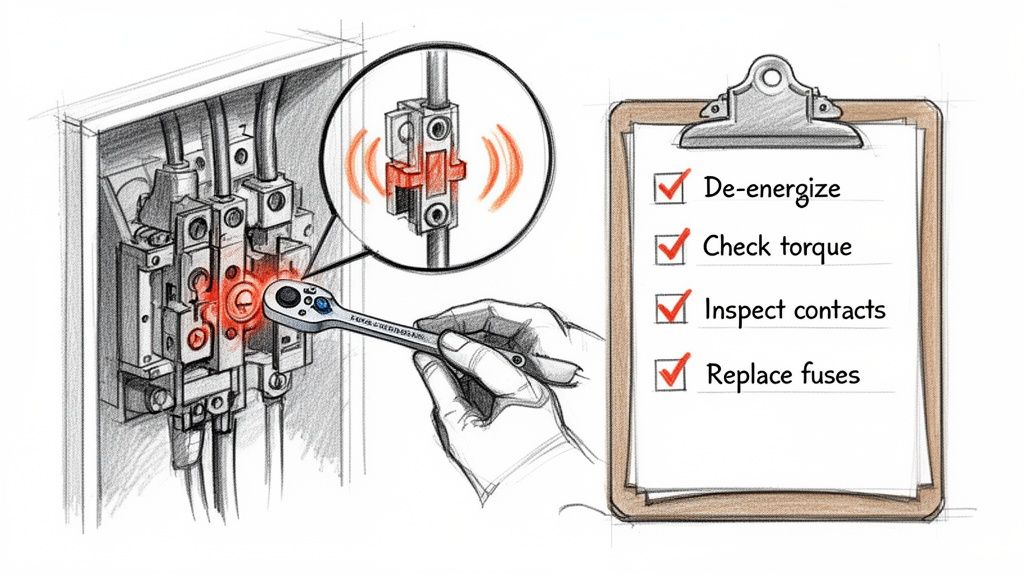
- Kill the Power & Lock It Out: The first step is always to throw the switch handle to the OFF position. Immediately follow that by applying your facility's Lockout/Tagout (LOTO) procedure to the handle. This ensures no one can accidentally flip it back on while you're working.
- Verify It's Dead: Trust, but verify. Use a properly rated multimeter to test for voltage on both the line and load sides of the switch. Always test your meter on a known live source before and after you test the switch to prove your meter is working.
- Swap the Fuse: Only after you’ve confirmed a zero-energy state should you open the fuse door or pull out the carrier. Replace the blown fuse with an exact match—same class, same voltage, and same amperage.
- Power Up Safely: Once the new fuse is in, remove your lock and tag, close the panel door, and only then should you move the handle back to the ON position.
A Few Common Questions From the Field
When you're out there designing panels or walking a plant floor, the same questions about fused disconnects tend to pop up. Let's clear up a few of the most common ones we hear from engineers and technicians.
Fused vs. Non-Fused Disconnects: What’s the Real Difference?
Think of a non-fused disconnect as a simple light switch for your equipment—its only job is to provide a clear, visible break in the power for service. It’s purely for isolation and offers zero defense if something goes wrong electrically.
A fuse disconnector switch, on the other hand, is the whole package. It does that same critical isolation job and integrates overcurrent protection with fuses. It’s a single, compact device that protects your circuit from both dangerous short circuits and damaging overloads.
Can I Use One as a Motor Starter?
Absolutely not. A fuse disconnector switch is built for safety and protection, not for the constant, day-in-day-out cycling of starting and stopping a motor. That kind of repetitive action will destroy it.
For actually running a motor, you need a dedicated motor starter, like a contactor and overload relay combo. They’re designed for that specific, high-endurance task.
It boils down to this: a motor starter is for operation, while a fused disconnect is for protection and isolation. Mixing up their roles is just asking for equipment failure and creating a genuinely unsafe situation.
How Do I Pick the Right SCCR?
This is a big one. The Short Circuit Current Rating (SCCR) you need is all about the "worst-case scenario." You have to figure out the maximum available fault current at the exact spot you're installing the disconnect.
Your fuse disconnector switch and the fuses you put in it must have a combined SCCR that is equal to or, even better, greater than that number. This guarantees it can handle a massive fault without exploding. Getting this calculation right is a non-negotiable part of designing a safe, compliant panel that meets UL 508A and NEC standards.
For robust, reliable UL-listed control solutions that incorporate the right fuse disconnector switch from the start, you can trust the experts at E & I Sales. Find out more at https://eandisales.com.